How Tweet It Is…

One of the best things I have done this year for professional development is to participate in Twitter chats that interest me.

When I have talked to teachers about this, they seem overwhelmed by getting started, so I have added some instructions below on how to find chats that interest you, creating a Twitter account, tools that make it easier to chat, and chat etiquette.

Where to start:

  1. Search this link  to add all of the educational Twitter chats to your Google Calendar.  See below for a diagram of what to click:

Chat Schedule.png

2. If you don’t already have a Twitter account, go here and sign up.  I put this step second, because I think it’s nice to have a reason to sign up first:)

3. Bookmark the Tweetdeck website and sign in with your new Twitter Account.  Here is what the dashboard looks like:
2016-03-24 13_28_26-TweetDeck.png

column add.png

a. Click on the “+” button to add a column.

b. Choose the column type that you would like to add.  I like to add a notifications column and a search column for each chat I am trying to manage around the same time.  My standard setup is show above.

column selection.png

Click on two little lines at the top right of your column.  Click on “Content” and the dropdown box shown above will open.  Type in the hashtag for your chat in the “matching” text box.  There are lots of other options you can mess around with, but I find this simple setup is good enough for me.

4. Open Tweetdeck at the time your chat is scheduled to start and look for the first question.

tweet table

5. The moderator will pose a questions labeled Q1: and you will respond to that question with “A1:.”  Follow this protocol for all answers respectively.  Make sure to add the hashtag for your chat onto your tweet.

Feel free to comment on other peoples comments and retweet great ideas!  A great way to grow you PLN (Personal Learning Network) is to follow people that you learn from!   This way you will see all of their tweets in your feed.

Please post questions and comments and I will try to address them in the comments.


3 Act: Gatorade is Thirst-Aid (4.MD.A.1)

My very first 3 Act Tasks inspired by a trip to Walgreens for a sick teenager!  Here is the link to the lesson on Nearpod.

Act 1:

How many cups are in the bottle of Gatorade?  Write an estimate that is too high and one that is too low.

Act 2:

What information do you need to help you find a solution?

collage-2016-03-22 (3)

1 cup = 8 ounces

The Gatorade bottle has 28 fl oz.

Act 3: 

Please give me feedback as these are the first two I have tried on my own.

Thank you to Melissa Plunk for suggesting the video edits!

3 Act: I Feel Sick (5.NBT.B.7)

I was at Walgreens last night to buy my sick teenager some Gatorade when I was faced with the following scenario, so I decided to put it into a task for review of division of decimals.  I also thought it might be a good primer for the measurement chapter they are on. Standard 5.NBT.B.7.  Here is the Nearpod Link.

Act 1:

Act 1 Gatorade.png

Estimate how much each bottle cost per ounce.  Give a too high estimate for each and a too low estimate for each.

What information do you know?  What information do you need?

Act 2

FullSizeRender.jpg

How much does Cool Blue cost per ounce?  How much does the Orange cost per ounce if you buy two?  If you buy only one?

Act 3

IMG_4311 (1)IMG_4311

Processed with MOLDIV

Processed with MOLDIV

What’s the math?

Please leave me feedback on how I could make this task better.  It’s my first one!

Would it be better to start with a video of me opening a wallet with $5 in it and reveal with a video of me checking out and the change I get back from the cashier?  Come to think of it, that would be a great 3 act on percentages (for tax).

Homework: What do Students think?

We (4th and 5th grade) have been itching to flip our classrooms ever since we got our Chromebooks this year.  We have experimented with flexible scheduling and had students watch the lessons in class, but due to the fact that many of our students don’t have internet access at home, we have yet to be able to fully implement it.

Chelsey Meyer and I decided we were just going to dive in and open up our library to students in the morning to come watch their lessons before school if they didn’t get a chance the night before and make it happen!  We worked on an Imagine Grant to allow us to buy some comfortable seating for the Library (Learning Commons) and started talking about how we would implement it (fingers crossed).

We talked to the students in her class about it and it became very apparent that our ideas of how they learn best might not match up to their own.  So we gave the students (in 4th and 5th grade) a homework survey in order to gauge their preferred method of homework and the time of day that would work best.  The results are below.homework 1

After looking at the results, we had a lot of questions. Who are the students that like homework?  What specifically do they like?  Homework 2

Did they really like worksheets?  Or was it that they had’t had the experiences with other homework projects?

homework 3

Almost 33% of students said they like their current homework, but only 24% liked doing it at home.  Due to our before and after school duties, it made sense for us to start by opening up the Library early in the morning to start and then re-evaluate after a period of time and look at putting some supports in place to allow us to open in the afternoons.Homework 4
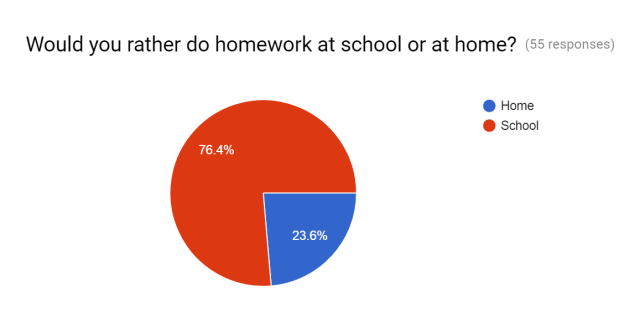
We decided to open up the school in the morning to them, do a week of project based homework and a week of flipped lessons and give the survey again.  We also decided to start with 4th grade math and bring in 5th grade when we could gauge the number of students we would have in attendance.  We are sending home a letter to parents explaining the change and will start next week!


What’s the Whole?

Our fourth grade students were having trouble visualizing subtraction of mixed numbers, so I was asked by the fourth grade teachers to do a lesson reviewing this concept.

I decided that we would start with a problem from their math books, but instead of solving it, just talk about and visualize what one whole would look like in the problem.  We started with a problem (3 2/4 – 1 1/4) that did not require regrouping and I asked students,

“What would one whole look like in this problem?”

I asked students to turn and talk to a partner to come to a consensus.  Many of the IMG_3888students immediately started solving the problem and raising their hands to tell me the solution.  I reiterated the fact that I was not looking for a solution, I simply wanted them to think about how we would represent 1 or one whole in fraction form.

Student: “four fourths.”

“How do you know?”  “Can you prove it?”

Student: “Well on a number line that is split up into fourths, it would be four fourths.”

“Can you draw that for us?”IMG_3890.JPG

Student: “If you split up one whole into four parts, it would be all of the parts.”

“Can you draw that for us?”

“Oh okay, that makes sense.  So will one whole always be represented by four fourths?”

Students: “No.”

“Let’s try another problem to see if we’re right.”

4  3/5 – 2 4/5

“What is one whole in this problem?”

Students: “five fifths.”

“How do you know? How can knowing that help us solve this problem?”

“Do you remember in 1st grade when you learned to make exchanges with base-10 blocks?  What could you exchange one long for?  How many base-10 cubes?”

Student: “10.”

“In this problem what could we exchange one whole for?  Let’s look at it using our virtual manipulatives.”

At this point, we had students go to the fraction tiles manipulatives on ABCya and begin modeling the problem.  abcya

“So how many whole pieces should I have?”

Student: “Three.”

“And what other tiles do I need?”

Student: “three fifths.”

“Come show me what that looks like.”

Once the students had the pieces on their computers, I asked:

“So what could I exchange one of these wholes for?”

Student: “five fifths.”

“Let’s do that.  Let’s lay them right underneath the whole to make sure that works.  Yes, it works.”

“So now can we solve this problem?”

Students: “Yes.”

“How?”

Student: “We can just take away two wholes and four of the fifth tiles.”

“How many does that leave us with?”

Student: “One and four fifths.”

We did this with several examples before having students work independently.  After they modeled it, we asked for volunteers to come show the class what they did.  Here are some examples:

One of the things that we discovered during this lesson was that several students were having difficulty organizing their fraction pieces.  We ended up having them draw a line down the middle of their screen and when they removed pieces, they moved them to the other side.  That way they could easily tell which tiles were left over.  This virtual manipulative tool is a little sensitive, but it is one of our favorites for ease of use.

subtracting mixed numbers

This is a flow chart to help students visualize that there are different types of problems and they should be treated differently.

After the lesson, we had students complete the independent practice sheet on the last page of this packet.  The other pages can be used in small groups with students to show another way to visualize the difference.

The Amazing World of Gumball Math

One of the fourth grade teachers I work with had a fantastic idea for reviewing measurement. She said she was frustrated tripping over gumballs from the tree outside the school and it could be really fun to review measurement (the concept her students had been working on) using this problem-basegumball 2d situation as a springboard.  She asked if I could help her come up with some activities for her lesson the following day and she would work on some too.

I put together some activities for her using the Gumball Character for the TV show The Amazing World of Gumball as the theme while I was participating in a Twitter chat (her version turned out way better!).  While I was working on my version, I decided this would also be a great way to review multiplication using arrays and would create a great entry point for all students.

She set up the activity by telling students they would all start using the multiplication sheet by making arrays and then writing down arrays others had made.  They didn’t have to draw the array (there was space if they wanted to), but they did have to write the corresponding multiplication equation.  After a few safety tips and discussion about determining which tools they would need for the measurement portion, we headed outside.

Arrays

We had several surprises as students completed the array activity.  Some students were just counting gumballs and then trying to figure out the multiplication equation that would go with it, which was fine until they got to a prime number.  We prompted with,

“Make an array using those gumballs.”

Some needed a review as to what an array looked like, once that was cleared up they were on their way.


Other students were making arrays, but not sure how to set up the equation when they encountered factors they did not have memorized (red flag!) such as 14 x 2 or 7 x 6.  We asked things like,gumball png

“How could we partition the array into friendlier facts?”

For some students that was enough, for others we had to partition it and then follow up with

“Do you see 10 groups of 2? How many groups of 2 are left?”  


Extensions

This got me to thinking about extensions to the activity such as:

Get a few handfuls of gumballs.  Write the factors and the product

or  Write the corresponding division sentence. How can we represent the situation if it is a prime number?

This would be a great introduction or review of prime numbers and lead to a discussion of order of operations such as 19 = 2 x 9 +1 or division with remainders, which really opens up this activity to fifth grade students as well.

In third grade, this could be used as students explore arrays and strategies for multiplication and division.  Students could write the fact families for each array or the strategies they used to solve the multiplication sentences.  Also great as they are learning about the commutative property.

Measurement

As students began their measurement activities, we noticed even more misconceptions. One of the problems that got misinterpreted was “The number of gumballs that fell in one square meter.”  Some students started measuring the perimeter of one square meter and others tried to find a square (sidewalk) that measured one square meter.  Many groups required prompting for this such as,

“Let’s reread the question.  It says…”  “Where did the gumballs fall?”  

Students: “over there!”

“So where should we be measuring?

Once they realized that they would be finding the gumballs that fell, many students still did not know where to start.  We asked,

“What would one square meter look like?”  “How could we measure that?  

We only had one meter stick so students were having a hard time figuring out how to make the square.  We asked,

“How many centimeters in a meter?” “Do we have a tool that would measure that?”  “How could that help you?

This was really the prompt that led to what you see in the pictures.  Students started to realize that they could lay measuring tapes on each side.  However, when I went to look at their squares, many had not measured to the 100 cm mark on each side, they had used the entire tape.  I then prompted with,

“How many centimeters should be on each side?”  “Is that what you have here?”

Once that was established, some students thought they would then fill the square meter with gumballs and count it.  After all that’s what we do when we practice area in third grade.  We count the square units inside.  This led us to ask,

“Let’s go back to the question.  What does it ask?”gumball 2

Some still needed more prompting such as,

“So how could we find the number of gumballs in the square meter you just made?”

Students, “Count them?”

“Would that answer the question?”

Students, “Yes.”

“Then it sounds like you have a plan.”

We (but most importantly, the students) really enjoyed this opportunity to get outside and get our hands dirty.  The great thing is that while completing these activities, students managed to clean up over 10 paper bags of gumballs from the ground outside our school!

Student engagement was off the charts and the activity allowed for multiple entry points.

One of the students who has an intellectual disability also decided to use a pan balance using rocks and gumballs to explore.  It created the opportunity to discuss comparison of numbers and weights.

Here is a link to some of the activities.  The document Mrs. Anderson made is more inclusive and I will add that once she sends me the link.

There is also a link to a American Forests site that I think could be a cool extension on measurement of the height of trees.

If you don’t have gumball trees at your school, try using rocks or sticks or other seedpods!

You Know Nothing Jon Snow

rcet

I’m going to assume that if you are reading my post (on a math blog) chances are that you too are a Game of Thrones fan and will get the title:)  If not, google it!

A colleague and friend of mine, Chelsey Meyer, and I presented on Boosting Engagement in Math Class today (and will again tomorrow) at the RCET Conference at MSU.  In doing so, we got to attend several great sessions offered by other Missouri Educators.  If you haven’t attended the RCET Conference, I highly recommend it.

The first session we went to was on becoming a Google Certified Educator.  When we got to the conference today I thought I was proficient in using Google apps, when I left that session I felt like I wasn’t even using Gmail to its potential.  This presentation could have easily been a week long conference on it’s own.  Some of the things we learned about were: Choose Your Own Adventure, Google Sites, Google Scholar, and tons of add-ons and additional features in apps we were already using.

If you don’t know much about Google Certification,  you should definitely check it out.  I didn’t even know that the certification existed…and best of all, the tests can be taken from your home, on your computer, for $10!  Google also offers all of the training for said tests, free.   Check it out here.

We also got to attend a session on Google Classroom that really answered a lot of my questions about how to best integrate apps into the classroom for online collaboration.  We were able to brainstorm together about how we might use this in conjunction with our LMS and save students time on the tech side to allow more time for the learning and collaboration.

Another great piece of information we gained today was Google CS First.  This is a site with ready-made activities to start your own club in things like Game Design and Animation!

I’d love to hear from you if you are a Google Certified Educator and will try to keep up on posting about my journey (and Chelsey’s) as we complete the training and take the tests!